
Distort : an exploration in image making
- bluepuppy142
- Feb 16, 2020
- 5 min read
Recently, I learned how to change an image-- not through photoshop, or illustrator, or clip studio paint-- but through a program called TextEdit. It's a bare bones kind of program: it has just the essentials-- an area to type and a few other items. I didn't know what I was getting in to-- but the results of this exploration were fantastic, and I learned a lot!
I had no idea that images could be processed as text. In retrospect it makes sense--after all, pixels express themselves in different ways depending on the kind of code that is inputted to them. I guess I’d never really thought about it before: never thought about the way an image had to be broken down into information a computer could process; never questioned how the organizational structure of an image must be determined by lines of code.
A brief over view of what I did:
How to ‘hack’ an image In Nine (or less) Easy Steps ™
1. Choose an image. This process works best with JPEG images-- PNGs will work as well, but have less variety of results. In my experience, even if a PNG file is converted to a JPEG, the file will not have as much variability as a file that originates as a JPEG. Additionally, you will want to use a lower quality image, since high resolution images tend to contain a lot more information, and require more changes to the image’s code before there are any visible results.
2. Make sure you have a text editor program-- for this exploration I used TextEdit. A word processing engine like Microsoft Office / Microsoft Word doesn’t work for this process since those programs have a lot of extra code for font setting / other functions.
3. Download your image to your desktop. Give it a recognizable name.
4. Duplicate your image, so that you have a copy of the original image in case you need to go back to it later (and you have a record of what you started with!)
5. Click ‘rename’ on your original image. Change the file type from .png / .jpg to .txt . This will convert your image information into text.
6. Open your file in TextEdit. From here you can directly alter the image’s information-- you can copy, paste, delete, and replace text to your heart’s content! (although, eventually, you might break your image: with too much change, it might become impossible for your computer to open back up.
7. When you’re satisfied with the amount of changes you’ve made to your image’s information, hit save, then close the document.
8. Go back to the ‘rename’ option on your image, and change its format from .txt to .jpg (or .png, if that’s what you were working with originally)
9. Open the image and glory in your newfound power to hack! If your image doesn’t open, try using different viewing windows. If none of them work, then the image is broken. Don’t despair! Try again! More than likely you only need to reduce the number of changes you made to the image’s textual information.
Some discoveries I made while messing around with my own images:
a. Deleting a lot of information from an image is a good way for it to break. Additionally, with PNG files, deleting small portions of information can make portions of the image ‘blank out’ or disappear from view. The area that disappears corresponds to how low in the image information you scroll before deleting text. Typically, any point below where information was deleted will be blank as well. However, this does not mean the image information is gone. If one tries to print out or upload the 'blank' image, they will be in for a surprise. Here’s an example of how these 'blank' images look when they've been uploaded:


Here's an example of how the image appears in a viewer such as Preview:
Through exploring this I learned that the information for an image is stored top to bottom, which explains how, when computers are struggling to process a particularly large image, the image loads from top to bottom, left to right.
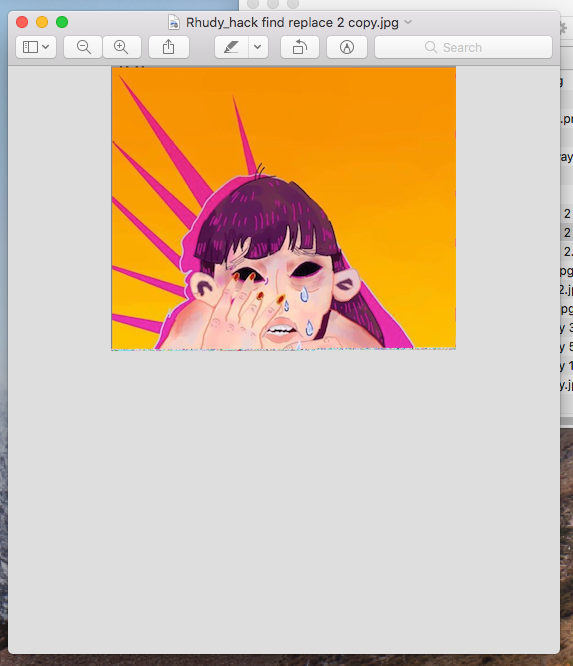
b. In JPEGs, if you copy sections of text already present in the image, and paste the same information below the original source of code, the result will be a bar (or bars, if you do this a lot) of slightly distorted color and pattern that runs horizontally across your image. Example:

c. Adding text (for example, poetry), does not seem to distort the image.
d. Using the find & replace tool in TextEdit is a really quick way to change an image. It can lead to breaking an image pretty quickly, too.
e. Changing the alignment or direction of the text doesn’t change the image at all. (more than likely, when I was playing with this element, I was only making changes to how TextEdit presented the text (display-only changes), not actually changing information in the image’s text.
Other notes:
What I found frustrating about the process was how difficult it was to create a variation in the types of lines and distortion in my images. I believe that this was due to the file type, which was a .png-- JPEGs seemed more flexible in terms of changes. Additionally, alterations to png files seemed to be very difficult for viewing windows (the Preview app, for example) to process/access. JPEG images had fewer issues than pngs, with more variation and flexibility in terms of image changes as well as being easier for the viewing windows to process.
Questions going forward: Could I apply this method of work to animation? Is the information that makes up images technically ‘code’, or something else? What is that information called? Can messages be hidden inside images to create some kind of code? Are there ways to ‘read’ an image’s information-- i.e., is there a way to tell what part of the image information relates to color/saturation/alignment? Or is that information unique to each image?
In the future I would like to apply these techniques to animation, as well as gain more control over how exactly I change the image-- I want to learn what area of information relates to which area of image. Additionally, I would like to experiment with embedding information or messages in images, or devise some kind of communication through images.
This exploration has really opened up my mind in terms of how one can use digital images, and helped me see the image not just as a product, but also as a potential tool. I think that letting students explore images in this way is very valuable-- this ‘lesson’ could easily inspire students in their next projects/ideas, especially digital explorations. Additionally, this experience would help students understand better how computers work, and show them that computers have potential to create art outside of programs like Adobe Photoshop / Illustration / Clip Studio Paint / etc.
Some of my favorite images from this exploration:


Comments